|
Introduction
Overview
Computer requirements
Packet Engine Pro
Configure AGWPE
Download and Install
Basic AGWPE Setup
2 Radio Setup
2 Card Setup
Sound Device Setup
Basic Device Settings
Rename Sound Device
Additional Settings
Using the Tuning Aid
Problems?
Program Behavior
Receiving
Transmitting
Connections
Firewalls
AGWPE Features
AGWPE on a Network
Baud Rates & Modes
Remote Control
TCP/IP Over Radio
Tips and Tricks
Traffic Parameters
Compatible Programs:
Setup Help
Radio Interface
Getting Started
Kits and Pre-assembled
USB SignaLink
Receive Audio Cable
Transmit Audio Cable
PTT (TX Control) Cable
2 Radio Modification
About Packet
Packet Overview
Exchange Modes
TNCs and AGWPE
What
To Do with Packet
Common Frequencies
Frame Headers
Further Reading
|
|
APRSplus and KipSS/PE with AGWPE
There
hasn't been much news about this program lately. I believe it is still
available but it only works with Street Atlas versions 4-9. Those versions are no longer
readily available. This page remains on this site in case there is
someone interested in exploring this trend-setting dynamic mapping APRS program.
APRSplus is
a Windows-based program for receiving and plotting APRS position
packets. It was written by Brent Hildebrand, KH2Z, and works in
combination with Delorme's Street Atlas program (or
Map 'N Go). APRSplus
handles the APRS packet management and then generates icons that are placed on
the Street Atlas maps.
Note: APRSplus only works with Street Atlas
versions 4 through 9. It will not work with the Road Warrior Edition and
Deluxe versions, including SA-2003 and SA-2004.
To make APRSplus work with
AGWPE you also need Brent's free program, KipSS/PE, which will link
the two programs using their respective TCP/IP interfaces. Note
that KipSS/PE only works with a registered version of APRSplus !
So,
you'll need to send Brent the registration fee to get a registration code (info
in APRSplus files) if you want to use APRSplus with AGWPE.
Stephen
Smith, WA8LMF, gets all the credit for working out all the
instructions below for running APRSplus with AGWPE.
Quick
Links for this page:
Setting Up APRSplus and KipSS/PE
Configure KipSS/PE
Configure
APRSplus
Getting it All to Work
Settings for 2 Radios
Automating the Startup Process
Troubleshooting APRSplus-specific problems
1. Setting up APRSplus and KipSS/PE to work with AGWPE
No changes
are needed in your
cables,
windows setup,
and
AGWPE program settings. They are the same as
for other applications. a..
Find a download of Delorme Street
Atlas if you can. Install it and verify that it works normally.
- APRSplus
files can be found at the TAPR site:
ftp://www.tapr.org/aprssig/winstuff/aprsplus/
The main APRSplus installation file usually has a name like
APRSPLUS2xx.zip.
APRSplus
documentation
- From the same TAPR directory also download
KipSS/PE
(don't confuse it with the similarly named
KipSS.zip.)
KipSS/PE is a middleware program that connects the TCP/IP interface of the AGW
Packet Engine to the TCP/IP interface of APRSplus. In effect, KipSS/PE
makes APRSplus "think" it is receiving data from from a TNC
instead of a TCP/IP source or LAN.
(APRSplus can do this in addition to connections from a "real"
hardware TNC and/or Internet connections. Part of APRSplus'
confusing complexity is its incredible
versatility!)
Unzip
both
zip files into the same directory on your computer. After you do that, run the
Setup.exe
program in the directory to initialize and install APRSplus.
- For future convenience, first create a Windows shortcut to
KipSS/PE.exe on your desktop.
- Start AGWPE.
- Now start KipSS/PE. A dialogue window will open that
looks similar to this:
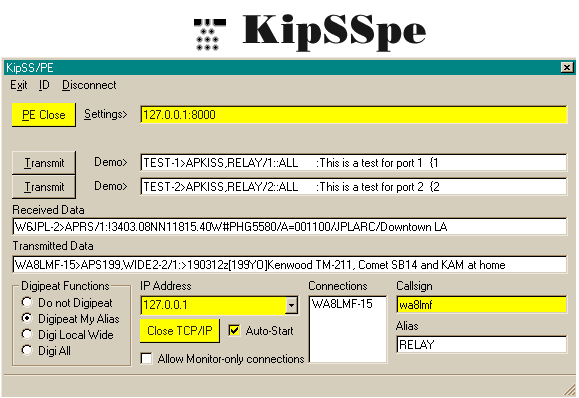
-
Don't worry about the values in most of the fields.
Just make the following changes:
- At the bottom of the window, for the IP
Address choose
127.0.0.1.
- (If you have a network address, you could
perhaps also use that. Just make sure the address you enter in this
field is same the address you enter in APRSplus (below).)
- Insert your callsign into the
Callsign
box in the lower right corner.
- Check the box for
Auto-Start
to open the TCP/IP connection to AGWPE automatically whenever KipSS/PE
starts.
- Now click on the Open TCP/IP
button below
the IP Address box.
- Then, at the top of the window, click on the
Open button to the left
of Settings>.
After you press the buttons, they should say
Close TCP/IP
and
PE
Close, respectively, as in the picture above.
Is it working? At
this point, you should be able to see packet data appearing in KipSS/PE's Received
Data window whenever you hear packets bursts from the radio's
speaker or see the radio's BUSY indicator/"S" meter light
up or see the little green pixel in the AGWPE modem icon
 in the System
Tray. in the System
Tray.
Likewise, you can test transmitting by pressing one of
the Transmit buttons and checking to see if your radio transmits.
The info in the Demo> field should be
duplicated in the Transmitted Data field
and your radio should transmit.
KipSS/PE Program Notes: As you'll learn, the labels on the
KipSS/PE button tops do not indicate current
status, but instead show what the setting will change to when
clicked, so PE Close on the button means
it is currently in the PE Open state and
clicking on the button will close it.
Also note that some of the Windows controls for
KipSS/PE program
do not follow convention. For example, clicking the  button in the upper right corner of the window does
not shut down the
program. It
only minimizes it into the system tray where the KipSS/PE icon ("KISS" in Morse code)
button in the upper right corner of the window does
not shut down the
program. It
only minimizes it into the system tray where the KipSS/PE icon ("KISS" in Morse code)
 will appear will appear .
This is how you will probably want to run the program -- with the
dialogue
window closed and only the program icon showing in the system tray.
To recall the KipSS/PE dialogue window, just click on the system tray
icon
.
To truly shut down the
program, use the menu bar and select Exit.
When you exit, all your settings will be saved, although
if you did not
check the "auto start" checkbox, the next time you start KipSS/PE you will have to
press both
buttons.
Remember:
You must obtain a registration number for APRSplus from Brent, KH2Z,
before you can run APRSplus with KipSS/PE and AGWPE.
There are multitudes of setting screens and options
in APRSplus, so I can't tell you how to configure APRSplus entirely on
this page (see instead the unofficial
APRSplus
documentation web site). But here are the
key settings for working with KipSS/PE and AGWPE.
a. From the menu bar
at the top of the main APRSplus screen, click on Setup
. Make sure that the following settings are
entered:
-
On the Main Parameters tab,
insert a callsign, your
registration
number (include the dashes between numbers), and your latitude
and longitude.
- On the Program tab,
check mark the version of Street Atlas you
are using. If you don't, APRSplus won't be able to start Street Atlas
automatically.
- On the Internet tab,
the items in the bottom Interlink section
should look like the following:

(If your PC has an IP address assigned to it by networking software
or a cable modem or DSL, if may have a different IP address
to the right of the Link-1 and UDP-Open
buttons. If so, that's OK; leave them as they are.)
|
|
- Check the x
Open
KiSS on startup if you want
APRSplus to automatically open a connection to KipSS/PE when it starts.
(Alternatively, you can leave it
o unchecked and start the connection
manually in APRSplus by using the Commands
menu option and selecting KipSS Connect.)
|
|
|
- In the field to the right of the
KipSS-Open
(Close)
button, enter 127.0.0.1:7301
(or the IP address you may have entered in the KipSS/PE field for
IP
Address).
|
|
|
- Leave "as is" the values to the right of
the Link-1,- 2,-3 and UDP-Open (Close) buttons. They are not important
for KipSS/PE connections.
|
|
|
- Save your setting by using the
File:
Save (or Save As) option in this
window to save your Setup.reg file in
APRSplus' Data folder.
|
|
|
- Now click on the
KipSS button until
it says
KipSS-Close. This will open the
link to KipSS/PE.
|
Program Notes: As
with KipSS/PE,
the labels on the button tops
are not "current
status" indicators. Instead, the button shows what the setting
will
change to when the button is clicked; so when it says
KipSS-Close
on the button, it is currently in the KipSS-Open
state and will close if you click on it.
You can also configure APRSplus to
connect to an instance of AGWPE running on a different computer on
your home network or any where on the internet.
See the AGWPE Over a Network page.
To make it all work, first start the AGW Packet Engine, then
KipSS/PE, and then APRSplus.
After the three programs have started, you should see 4 icons in the system
tray at the bottom of your screen:

The icon with two towers and the icon of a TNC are created by
AGW. The icon showing a stack of dits and dahs (Morse code for KISS) is
created by KipSS/PE. The inverted triangle is created by APRSplus.
Now, in APRSplus, choose Commands
and then select Start Street Atlas to start
Street Atlas. (You can also right click on the APRSplus system tray icon
to call up the Commands menu.)
If you did not select the "auto start KipSS"
function, use the Commands menu (Alt+C) to
select KipSS Connect.
If your radio is on, the cables are attached, and
the Volume Control settings are correct, you should start to see station icons in
the APRSplus Positions window and then
eventually in Street Atlas (depends on what timing interval you chose
for writing the APRSplus overlay file to Street Atlas; see the
Maps tab and the second field to the right of the
1- All Reports field).
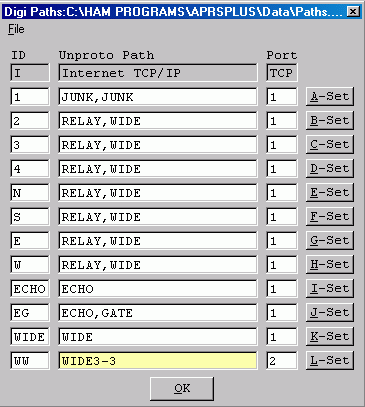
Use
the Commands: Unproto Paths
menu option (or Ctrl + Shift + U) to call up a list of UI paths. By
default the TCP port for all path choices is set to 1, i.e. AGWPE port 1/radio
1. To use AGWPE port 2/radio 2, pick an unused line and change
the TCP port to 2; you can also edit the path to one of of your choice.
Now press
the Set button to the right of the path
and port
you want to use.
That line will then be
highlighted in yellow to indicate it is the active path/port. Press the OK
button.
Want to get the AGWPE
program to automatically start KipSS/PE
and then APRSplus when AGWPE finishes loading? Here's how:
Locate the file AGWPE.INI in the AGWPE
program directory.
Open the file in the Windows Notepad
or any
other ASCII editor and add the following paragraph to the bottom
of the file:
[RUNPRG]
RUN0=C:\APRSplus\KipSS/PE.EXE
CMD0=0
RUN1=C:\APRSplus\APRSPLUS.EXE
CMD1=0
Note: Be sure to edit the file paths
in the instructions above to match the drive and directory where you have
installed the KipSS/PE and APRSplus programs.
Then save the file and close the editor. This
automated process will begin the next time you start AGWPE.
-
To see if AGWPE and
KipSS/PE
are working together, start AGWPE and then KipSS/PE
(without starting APRSplus). Assuming that
AGWPE
is working correctly and receiving packets, you should see packet data appearing in
KipSS/PE's Received
Data window whenever you hear packets bursts from the radio's
speaker or see the radio's BUSY indicator or "S" meter light
up or see the little green pixel light up in the AGWPE icon
in the
System Tray.
-
To see if APRSplus and KipSS/PE are working together, transmit
your status or position from APRSplus. Use the APRSplus Send
menu option or Ctrl-P or Ctrl-S.
Your position or status packet should then appear in the Transmitted
Data field in KipSS/PE.
(If they don't, go to the "transmit"
troubleshooting hint below.)
-
To see if
APRSplus
and Street Atlas are working together, temporarily use
either an internet connection or TNC instead of AGWPE to receive
packets and display them in Street Atlas. If you can't do that, at
the very least, APRSplus should be able to "beacon" your position
and icon and they should display in Street Atlas.
-
Firewall
problem? Remember that KipSS/PE will be using both IP port
8000 -- to talk to AGWPE -- and port 7301 -- to talk to APRSplus.
(8000 is the default ports for AGWPE; you can change it in AGWPE. I
think KipSS/PE's port link to APRSplus is hard coded as 7301 and can
not be changed.)
If you encounter difficulties with the programs connecting to KipSS/PE,
then your firewall program may be blocking access to one or both of
these ports. You will need to configure the firewall program to
allow open access to these ports. (How to do that is beyond the
scope of this web site; consult the documentation for your firewall
program.)
-
Problem: I can't
Transmit from APRSplus. I tell APRSplus to send a packet and I can
see that the packet made it to the "Transmitted Data"
field in KipSS/PE, but the radio doesn't key up even though KipSS/PE
is sending and receiving data from AGWPE and AGWPE is successfully transmitting
data from other programs.
Solution: The port settings for the Unproto
Paths in APRSplus is wrong. It may be set to 0
or it may be set to an AGWPE port that is attached to a different
radio. Pick a different UI path or change the path's port
number:
In APRSplus, use the Commands: Unproto Paths
menu option (or Ctrl+Shift+U) to call up a list of UI paths. Press
the Set button to the right of a
suitable path which uses the AGWPE port and radio that you want to
use; or edit an existing entry to create
a path of your choice and the AGWPE port of your choice and then
press the Set button.
-
Note that Windows Systems
Resources are an issue for Win95/98/ME users running
APRSplus. If your system resources get too low (below 25%?), you may
encounter unexpected errors in APRSplus and your Setup
values may become corrupted. You can check your current System
Resource level by going to the Window's Control
Panel and selecting System and
then the Performance tab.
Return to the "Compatible
Programs" page
|